SD BB MSN-04 Sazabi Building and Painting

I know it's been a while. But let's pretend like the most recent post was just yesterday.
Assembly
I had been meaning to try painting a candy finish for a while already, and what better kit do that on than the Sazabi. But because I didn't want to mess up my RG just yet, I thought to practice on the SD version first.
This SD kit was surprisingly detailed, and even came in two shades of red. But as with most SDs, this had seamlines on the head, knees/shins, and the rifle that needed to be removed. Not too bad, actually.
I modified the head to make the face plate removable. Same with the gray parts on the knees. I just didn't take a lot of photos of the process, unfortunately.
Oh, and I also used a half-round pearl piece for the monoeye intead of a sticker.
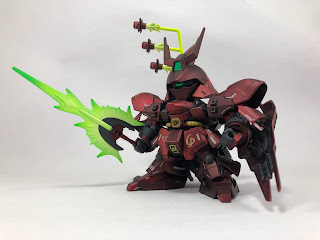
Painting
For painting, I started with the effect parts. This was my first time trying out fluorescent paints and trying to paint a gradient.


I was pretty happy with the results, but the yellow-to-neon green gradient that I was going for didn't come out as pronounced on the funnel effect.


I'm not sure if I didn't paint enough coats of metallic or clear red, but the paint came out a bit darker than I intended. I didn't feel like messing with it anymore, though, so I just lived with the result.
The next step was masking. There were so many small missing color apps that my OCD wouldn't allow to remain unpainted.
 |
| The gray parts here. See pieces of masking tape below. |
 |
| The weapon details |
 |
| All the hidden verniers and yellow accents |
 |
| This whole back skirt was also a single color |
After detail painting, I moved onto decals, with placement copied either from the Ver Ka and the RG. Since the finish was already glossy, I thought I could get away with not spraying clear gloss first before decal application. Unfortunately, when I did spray clear gloss to seal the decals, the thinner must have reactivated the clear red, which caused the red to bleed a bit onto some decals. Or maybe the clear red just hadn't cured enough yet. Either way, lesson learned: It's usually a bad idea to take shortcuts.

As I mentioned, I originally intended this to have a super-glossy candy-coat finish. But either due to some error with surface prep or paint application, the finish didn't come out as smooth as I had hoped. So I used flat for the final top coat to hide the flawed finish, going for an anodized metal look instead.


Comments
Post a Comment