Posts

Showing posts with the label 1/144

Modified and Painted HGUC (#40) MS-06 Zaku II

Image
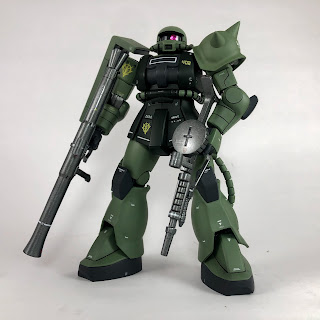
Here's the promised photoshoot for my HGUC Zaku II. To be honest, I was quite disappointed by the articulation and proportions of this kit when I had first snapped it together years ago. But now that it's detailed up like this, I'm appreciating it a bit more. Improving the derpy-looking monoeye helped the look quite a bit. I'm hoping to do a similar mod to my Origin Zaku II and HGUC Gouf. 2022 Update - I decided to change the monoeye piece and I thought to paint the heat hawk. New photos added at the bottom. I'd have done a few more action poses, but I was afraid of scratching the paint. Same reason the leg rockets got left off, even though I fixed them up too. New photos with the replaced monoeye and painted heat hawk are below:

Modifying and Painting the HGUC (#40) MS-06 Zaku II

Image
I bought this kit on sale a few years ago for just $9 with the intention of using it as cheap practice. I had built it and sanded and welded the seams (not very well), but I couldn't find the right green colors in spray cans, so this project got shelved (literally) for some time. Now that I had a respectable painting setup and some new tools, I thought that this kit might finally serve as a warmup before tackling more recent and expensive kits. My plan was to improve the monoeye and maybe add some more surface detail. So after disassembling the parts, I started with modifying the head. I couldn't stand how ugly the monoeye was, so I thought to try to make it look more like the MG 2.0 or RG. I found a curved piece of clear plastic that I measured and cut to fit in front of the monoeye. This clear plastic was soaked in Pledge to make it shinier. Next, I replaced the crappy monoeye sticker with a 4mm pink rhinestone. But because of the new protrusion, it wouldn't fit behind th

Display Case for the Bandai Millennium Falcon 1/144

Image
I was hoping to move on from posting about the Millennium Falcon . But as fate would have it, the display case that I ordered for it just arrived in the mail today and I thought to make a quick post about it. Bonus peak at my homemade light box with green screen I got this through Shopee straight from China for about $8.00, but I'm sure you can find the same thing on Amazon or Aliexpress. Just search for a Perspex or acrylic display case and be mindful of the dimensions. For the 1/144 Millennium Falcon, the 30 cm x 20 cm x 20 cm size is an almost perfect fit. The case is made of 5 interlocking clear acrylic sheets with a sixth black one as the base. Both sides of each acrylic sheet are covered by a protective film that you'll have to peel off to reveal the clear plastic. While the film does a great job of preventing scratches in transit, the static electricity generated when you peel it off pulls in so much dust to the sheet itself. It's easy enough to wipe down at least. B

Completed Bandai Millennium Falcon 1/144

Image
After around two months of work, here finally is my completed Bandai 1/144 scale Millennium Falcon. This build involved a lot of firsts for me: airbrushing , applying decals on bumpy surfaces , gunk-washing a kit , hand-painting pilot figures , installing custom LEDs , scratch-building a base , and even making my own light box for the purpose of this shoot. So without further ado, here are some photos of my completed model.

Scratch-Built Base for Bandai Millennium Falcon 1/144

Image
In the continuing tradition of giving myself more work than what I planned for , I had the urge to build a base that would conceal a power bank and a USB toggle switch for the lighting setup of my Millennium Falcon. I had never scratch-built anything with plastic before, but I thought a box would be an easy start. My idea was to make a base that the included sand-dune base could just sit on top of. A base for the base, if you will.

LED Lighting for the Bandai Millennium Falcon 1/144

Image
Before I started with this kit, I didn't really care for lighting it up. And I especially didn't care for the official Bandai lighting unit that sells for half the price of the model kit itself ($20?!). But when I saw how much space there was inside the hull, I couldn't help but take a stab at it.

Detail-Painting the Bandai Millennium Falcon 1/144

Image
Way back when I had just started with the kit , one of the first things I did was to attempt to hand-paint the details inside the turret gun wells using Gundam markers, which were the only paints I had at the time. I didn't care too much about screen accuracy at the start, but I came to regret my color choices as the build went on. Still, I couldn't be bothered to redo it for something that I knew would hardly be seen.

Weathering the Bandai Millennium Falcon 1/144

Image
With the decals and gloss topcoat in place, it was time to move on to weathering the kit. My challenge was that, aside from panel-lining and light usage of Tamiya Weathering Master, I had never seriously weathered a model before. For this kit, I researched a bit and saw lots of recommendations to start weathering with an enamel or oil wash. I was hesitant about using an enamel wash because I was still worried about aggravating  some of the cracks from before  even though the model was already protected by layers of lacquer topcoat. And I didn't want to deal with the smell of that much thinner. Oil paint wasn't really in consideration either as I didn't want to buy some new oil paint tubes and turpentine. Instead, I had an idea to make my own wash using my really old (nearly 20 years I think) Prang semi-moist watercolor set. If it turned out bad, I could just wash it off under the tap, I thought. To be on the safe side, I searched around for tutorials or discussions on the u

Water Slide Decals on the Bandai Millennium Falcon 1/144

Image
The Millennium Falcon comes with an assortment of colored panels and markings. And to reflect them on this kit, you can choose between decals and good old-fashioned masking. I definitely wanted to avoid the masking route because of a bad experience in a previous build and because I thought it would be easier to just use the decals. Bandai was generous enough to include both sticker and water slide decals in most of their Star Wars kits. The stickers are actually really good, but I decided to go with the water slides because I think the colors are slightly better. And I actually enjoy the process of applying them.

Airbrush-Painting the Bandai Millennium Falcon 1/144

Image
A bit more than a month after my hiatus from this kit , my paints and airbrush kit finally arrived. For paints, I bought a couple of lacquer-based primers and top coats and water-based acrylics from Armored Komodo since they were well-priced and highly recommended by a friend. Spoiler alert: I don't have a lot of experience with other paint brands, but I like these so far.

Panel-Lining the Bandai Millennium Falcon 1/144

Image
For my first few posts, I'll be backtracking on some builds that I had already completed , most recent of which is the Bandai Millennium Falcon 1/144 The Force Awakens version. My dad insisted that I pick up this kit when we were in Japan in 2016. I had built the 1/72 Resistance X-Wing  the previous year, so I knew the quality to expect. And for 4000 yen, it wasn't a hard choice. And this was before I knew I hated Disney Star Wars. But that's another story altogether.