Posts

Showing posts with the label Bandai

Completed SD BB MSN-04 Sazabi

Image
Here's my completed SD BB Sazabi. I ended up repainting the beam tomahawk because, after rewatching Char's Counterattack, I realized that I had painted it too green when the beam looked closer to yellow on screen. Damned OCD. Best buddies. Note the greener paintjob on the beam effect here.

SD BB MSN-04 Sazabi Building and Painting

Image
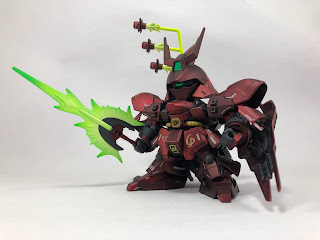
I know it's been a while. But let's pretend like the most recent post was just yesterday. Assembly I had been meaning to try painting a candy finish for a while already, and what better kit do that on than the Sazabi. But because I didn't want to mess up my RG just yet, I thought to practice on the SD version first. This SD kit was surprisingly detailed, and even came in two shades of red. But as with most SDs, this had seamlines on the head, knees/shins, and the rifle that needed to be removed. Not too bad, actually. I modified the head to make the face plate removable. Same with the gray parts on the knees. I just didn't take a lot of photos of the process, unfortunately. Oh, and I also used a half-round pearl piece for the monoeye intead of a sticker. Painting For painting, I started with the effect parts. This was my first time trying out fluorescent paints and trying to paint a gradient. I was pretty happy with the results, but the yellow-to-neon green gradient tha

Painting the 30MM Customize Scene Base (Landscape Ver.)

Image
Like I mentioned in the previous post, I experimented with different bases for the SD Neo Zeong . Figma stands couldn't handle the weight. The Action Base 1 was just too tall. The Action Base 2 was actually pretty good though a bit unstable due to the SD Neo Zeong's weight. But then I saw the 30-Minute Missions Customize Scene Base Landscape Version and thought that it would be a great way to emphasize or exaggerate the Neo Zeong's size. The base comes in three parallelogram-shaped plates that can be rearranged to suit your display. Each plate has a removable piece that covers the attachment point for a support arm. Unfortunately, the arm that comes with this package is just too thin for the Neo Zeong. As you can see in the picture above, the Action Base 2 arm crudely fits but also covers up a lot of nice details. But this was a problem to for later. And I couldn't stand to just let the base be gray when the packaging showed how good it could look when painted. It took

Modified and Painted HGUC (#40) MS-06 Zaku II

Image
Here's the promised photoshoot for my HGUC Zaku II. To be honest, I was quite disappointed by the articulation and proportions of this kit when I had first snapped it together years ago. But now that it's detailed up like this, I'm appreciating it a bit more. Improving the derpy-looking monoeye helped the look quite a bit. I'm hoping to do a similar mod to my Origin Zaku II and HGUC Gouf. 2022 Update - I decided to change the monoeye piece and I thought to paint the heat hawk. New photos added at the bottom. I'd have done a few more action poses, but I was afraid of scratching the paint. Same reason the leg rockets got left off, even though I fixed them up too. New photos with the replaced monoeye and painted heat hawk are below:

Modifying and Painting the HGUC (#40) MS-06 Zaku II

Image
I bought this kit on sale a few years ago for just $9 with the intention of using it as cheap practice. I had built it and sanded and welded the seams (not very well), but I couldn't find the right green colors in spray cans, so this project got shelved (literally) for some time. Now that I had a respectable painting setup and some new tools, I thought that this kit might finally serve as a warmup before tackling more recent and expensive kits. My plan was to improve the monoeye and maybe add some more surface detail. So after disassembling the parts, I started with modifying the head. I couldn't stand how ugly the monoeye was, so I thought to try to make it look more like the MG 2.0 or RG. I found a curved piece of clear plastic that I measured and cut to fit in front of the monoeye. This clear plastic was soaked in Pledge to make it shinier. Next, I replaced the crappy monoeye sticker with a 4mm pink rhinestone. But because of the new protrusion, it wouldn't fit behind th